

Configuring Domain (DNS Hosting)
Configuring Domain (DNS Hosting)
For the Exchange email service to work correctly, you need to add 4 DNS records for your domain: MX, SPF, DKIM, and SRV.
DNS Records
1) MX-record
| Name | Type | Value (content) | Priority |
|---|---|---|---|
| your_domain_name.kz | MX | protectionmail-a.cloud24.kz | 10 |
2) SPF-record
| your_domain_name.kz | TXT | v=spf1 redirect=cloud24.kz |
3) DKIM-record
To configure the DKIM record, you need to manually enter the following DNS records for your domain.
In the Name field, add
protectionmail-a._domainkey
In the Type field, select
TXT
in the Content field, add the key
v=DKIM1;k=rsa; p=MIIBIjANBgkqhkiG9w0BAQEFAAOCAQ8AMIIBCgKCAQEAr3nhrZlsWkNLLasMOqLbdaK4TqW3h9hOuIG4P6IKu4D05s5JuytY+cUTpYyoQUEIVEp2JOifJtGdsSPiYhaIXlxMmG3FanYwKfBW1P9PCVOzHlILT+sUrYOUkag6LJ2EDRJ8ZhGgV4uTJ3DQb8i5twikMN3YNrKgP/wQhP5valUB7CF0yv/wVXA4MiGknO/2cz3jQfPnVIXuIFbwIHl40Dp32ncTunTFYqbYIW2GseGQ2U5AVNeroys8waqF5+YULE+uz9gh9YMFuD8SvjoRKazeBZJ3epng0rhCO3BAzgR2heuNHXckPnR75kfmEgjKf6841J7TMvjKhul23adrywIDAQAB
The final record should look like this (do not copy the value from the table)
| Name | Type | Value (Content) |
|---|---|---|
| protectionmail-a._domainkey | TXT | v=DKIM1;k=rsa; p=MIIBIjANBgkqhkiG9w0BAQEFAAOCAQ8AMIIBCgKCAQ EAr3nhrZlsWkNLLasMOqLbdaK4TqW3h9hOuIG4P6IKu4 D05s5JuytY+cUTpYyoQUEIVEp2JOifJtGdsSPiYhaIXl xMmG3FanYwKfBW1P9PCVOzHlILT+sUrYOUkag6LJ2EDR J8ZhGgV4uTJ3DQb8i5twikMN3YNrKgP/wQhP5valUB7C F0yv/wVXA4MiGknO/2cz3jQfPnVIXuIFbwIHl40Dp32n cTunTFYqbYIW2GseGQ2U5AVNeroys8waqF5+YULE+uz9 gh9YMFuD8SvjoRKazeBZJ3epng0rhCO3BAzgR2heuNHX ckPnR75kfmEgjKf6841J7TMvjKhul23adrywIDAQAB |
- where
your_domain_name.kz is your domain name, for example: "mydomain.kz"
4) Autodiscover (SRV-record)
| Name | Type | Value (content) | Priority | Weight | Port |
|---|---|---|---|---|---|
| _autodiscover._tcp.your_domain_name.kz | SRV | autodiscover.cloud24.kz | 0 | 0 | 443 |
The Autodiscover record is responsible for automatic connection to the Outlook application via the MAPI protocol (useful for the Standard plan).
Important: if other CNAME or SRV records already exist for Autodiscover, they must be deleted, leaving only one correct record.
Some DNS panels of DNS providers explicitly state that you need to enter values without an underscore in the Service Name or Domain Name fields.
In this case, the record is filled out like this:
Service name: autodiscover
If the panel specifies that the SRV record name must have the format _service._proto, then the record must be specified with underscores, for example:
_autodiscover._tcp
or _autodiscover._tcp.your_domain_name.kz, if a fully qualified record name is required
Regardless of the DNS panel interface, the resulting SRV record should ultimately look like this:
_autodiscover._tcp.your_domain_name.kz. IN SRV 0 0 443 autodiscover.cloud24.kz.
For example, for the domain mydomain.kz, the final record will look like this: _autodiscover._tcp.mydomain.kz. IN SRV 0 0 443 autodiscover.cloud24.kz.
If your infrastructure uses Active Directory and an internal DNS server, you can add the same SRV record to the internal DNS zone of the domain so that Autodiscover works correctly on the internal network as well.
For example, if you have an internal zone mydomain.kz, the following record must also be created in the internal DNS:
`_autodiscover._tcp.mydomain.kz. IN SRV 0 0 443 autodiscover.cloud24.kz.`
To add a record on Windows DNS Server:
open DNS Manager (dnsmgmt.msc);
expand Forward Lookup Zones;
select the internal zone of your domain, for example mydomain.kz;
right-click on the zone and select Other New Records;
select Service Location (SRV) and click Create Record;
fill in the fields:
Service: _autodiscover
Protocol: _tcp
Priority: 0
Weight: 0
Port number: 443
Host offering this service: autodiscover.cloud24.kz
save the record.
If there are already CNAME or SRV records for Autodiscover in the internal DNS zone, they must also be deleted, leaving only one correct SRV record.
Example for SRV-record on PS.kz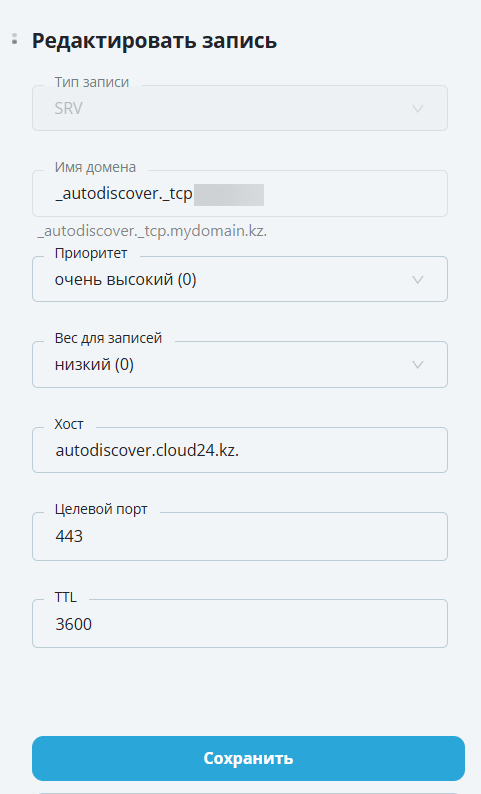
Example for SRV-record on Hoster.kz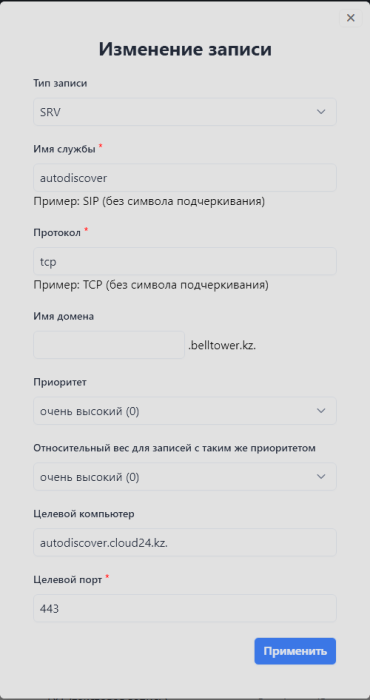
Example for SRV-record on DNS Windows Server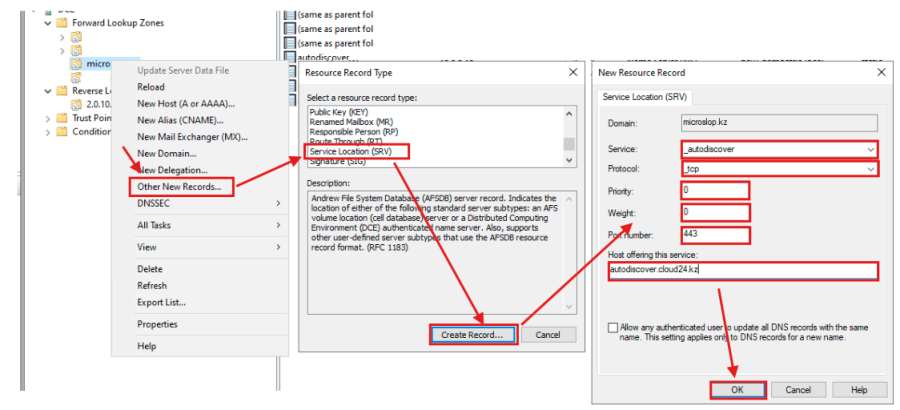
How to make sure DNS Records are Applied?
Updating DNS records can take up to 48 hours.
To check if the DNS records have been applied and are correct, you can run the following commands in the Windows command prompt, using the domain belltower.kz as an example:
1) MX-record check
nslookup -type=mx belltower.kz 8.8.8.8
The response after executing the command should look like the image below:
2) SPF-record check
nslookup -type=txt belltower.kz 8.8.8.8
The response after executing the command should look like the image below: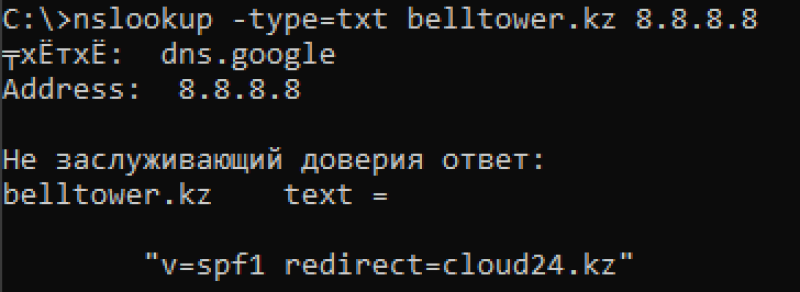
3) DKIM-record check
nslookup -type=txt protectionmail-a._domainkey.belltower.kz 8.8.8.8
The response after executing the command should look like the image below: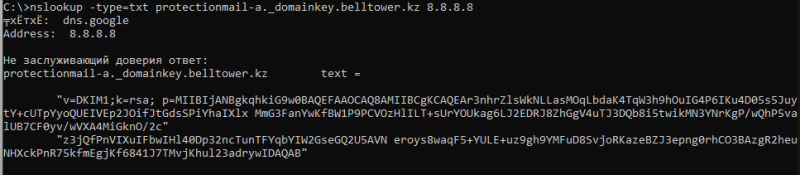
4) SRV-record check
nslookup -q=srv _autodiscover._tcp.belltower.kz 8.8.8.8
The response after executing the command should look like the image below: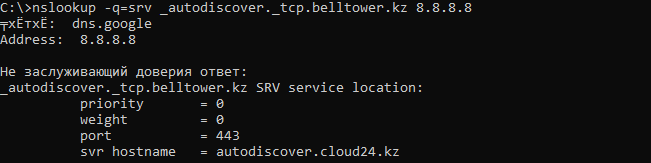
How to Add DNS Record on PS.kz
Go to the PS.kz website and log in to your personal account.
Go to "Account" then to the "Service Management Console"
Go to "Domains", click on your domain, then click on "DNS Zone Management" > "Edit"
As a result, you should have 4 records as shown in the screenshot:
How to Add DNS Record on hoster.kz
Go to the hoster.kz website and log in to your personal account.
Click on "Personal Account" then click "Domains"
Click on your domain. In the new window, click "Edit" in the "Resource Record Management (DNS Hosting)" section